
Basic Chain Kit Information
There are a lot of questions about chains, sprockets, gearing and so on. There are four items that make up a chain kit; front sprocket, rear sprocket, chain and master link. The chain and sprockets are a part of your drivetrain and can also be referred to as your secondary drive. You should always replace the chain and sprockets together unless you have very low miles on the setup. You see the chain and sprockets wear out together, and in a way "form" to each other.
Sprockets
All front sprockets for Sportbikes are made out of steel. The rear sprockets can be made out of aluminum or steel. With modern technology a 520 chain kit with a steel rear sprocket could last as long as your OEM (525/530) chain kit or even longer if properly maintained. A chain kit with an aluminum rear sprocket will save you some rotational weight but will not last as long as a steel rear sprocket.
Chains
All chains are made of steel and either anodized or powder coated to get their color. Most chains come with 120 links and you shorten it during install. Some chains are sold in longer increments such as a 130 or 150 links to accommodate bikes with a stretched swingarm. When you put the new chain on you can add links or take links away to make the chain as long or short as you want it. This lets you decide how far back or forward you want the rear tire. Remember you can always take more links off so don't overdo it and cut it too short.
Master Links
The master link is the link you use to connect the chain at both ends. There are three different types of master links: clip link, screw link and rivet link.
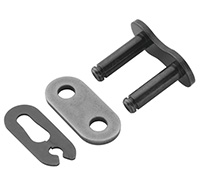
A clip link is the least secure of the three and when installed correctly is about 65% as reliable as the rest of the links in the chain. If not installed correct and even sometimes when they are, they can come off while you are riding. This can become a major problem resulting in a destroyed engine, injury to the body, or even a crash. They are easy to install and usually just require a pair of pliers.
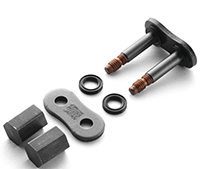
Screw links are about 98% as reliable as the rest of the links in the chain when they are installed correctly. Not all manufacturers offer screw links and they are not as common. Just like the name suggests, the link comes with nuts to screw the master link plate on. This can usually be done with a small wrench. The screws can stick out further and you may need to make sure you have clearance for it around your front sprocket area.

The rivet link is the most reliable and safest of the three options and is what we recommend. You will either need a chain tool so you can rivet the chain together yourself or take it to a dealer for them to install the chain kit for you. When installed correctly, the rivet link is about 100% as reliable as the rest of the links in the chain.
Gearing
The gearing means the tooth count of each sprocket. As you change the tooth count of a sprocket you will change the way the bike accelerates, top speed, RPMs per speed. You often here of - 1 or +2 or -1 & +2. Negative numbers normally refer to the front sprocket. This will increase acceleration. When people talk about positive numbers it is usually regarding the rear sprocket. Going up teeth on the rear sprocket will also increase acceleration. Going down 1 tooth in the front is about equal to going up 3 teeth in the rear. So, if you do +2 in the rear it's a little bit less drastic of a change than -1 in the front. You can also combine the two and run -1 in front and +2 in the rear.
Also note that by changing your gearing, it will affect your millage as well as your gas millage. The more aggressive you are with the gearing, the more drastic your gas millage will change. It will also affect your miles on your bike. When you go down in the front or up in the rear your speedometer will be off. Normally it will be higher than you are actually going. Many people don't mind this, but some do especially because it racks up miles about 5-15% quicker.
When you would want:
-1 set up: This gives you more acceleration out of your bike, but on the downside, you will lose roughly 10 mph of top speed in 6th gear. So, if you went 185 mph, you'll probably only go 175 mph now.
+2 set up: The most common setup, especially for 1000cc bikes. This gives you a noticeable gain in acceleration with a loss of about 7 mph on the top end. This would be recommended for someone that rides casually on the weekends, or commutes but wants more torque. A track day rider that is wanting a little more power out of the corners, with minimal top speed loss.
-1 & +2 combo: This will give you a good amount of acceleration, but keep in mind you will lose about 15-20 mph on the top end. It's great for stunters, drag racers, or guys on the street who want a lot of torque and rarely go high speeds. This is the most popular gearing for a 600cc bike as you lose very little top speed, because the bike isn’t running out of gearing, but the horsepower to cut through the wind. Since you’re not losing HP with this gearing choice you will gain a big boost of acceleration with a minimal loss to top speed.
Stock gearing example
|
Bike |
Front Sprocket |
Rear Sprocket |
Pitch |
|
01-06 GSXR 1000 |
17 |
42 |
530 |
|
04-05 GSXR 750 |
17 |
43 |
525 |
|
00-03 GSXR 750 |
17 |
42 |
525 |
|
01-05 GSXR 600 |
16 |
45 |
525 |
Gearing Ratio
You can find your gearing ratio by taking the tooth count for your rear sprocket and dividing it by the tooth count for your front sprocket. The stock gear ratio of the 01-05 GSXR 600 listed above would be 2.8125.
Speedometer Corrector
The solution for your speedometer being off due to changing your gearing is to buy a SpeedoDRD which will correct the error. This is a plug-in unit and easy to install. Not all bikes need this as many modern bikes have sensors on the wheels now and will get accurate speed even when you change the sprockets.
Pitch

Pitch is technically the measure of distance from the top of one tooth of the sprocket to the top of the next tooth or it is from one roller to the other roller of the chain.
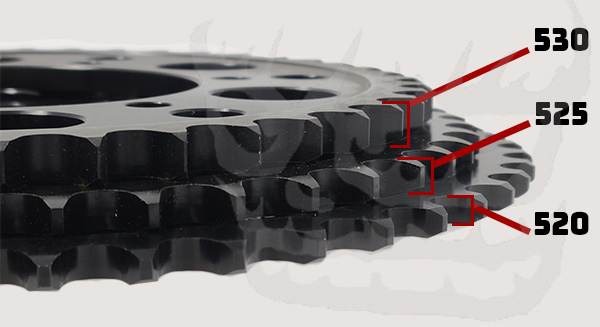
However, most common practice, pitch is referred to as the width of the chain and sprockets. You must use the same pitch for your front sprocket, rear sprocket and chain. The thicker the pitch (higher number), the stronger they typically are, but also heavier. Most who go to a 520 now go with a steel rear sprocket as it gives nearly the same longevity as a 530 rear sprocket if taken care of properly.
Conversion Kits
Most all 600cc and 750cc bikes come stock with a 525 pitch. However, you can easily switch to a smaller, 520 pitch setup, known as the 520 conversion. The bikes don't push enough horsepower (hp) to hurt a good quality 520 setup, especially with a steel rear sprocket. Most who ride a 1000cc bike will also convert to a 520. If you stunt, love wheelies, have a turbo, or have nitrous then you will likely want to stick with a 530 pitch setup.
Install & Maintenance Tips
- When installing your chain kit, make sure not to over tightening the chain as it can cause very failure of the sprockets and chain. If you set the chain too loose it will "slap" the sprocket as you take off and the slapping can cause a crack between the teeth of the rear sprocket or can widen the teeth and cause problems. Set your chain slack to OEM standards. We have found the looser side of your OEM spec works best. Rotate the rear tire as you check and check it in different spots of the chain. Don't assume the first spot you check is the tightest spot in the chain. That is the most important factor for keeping a setup around a long time.
- Also cleaning and lubing the chain at regular intervals.
- If you can't figure out which way the front sprocket goes in ASK SOMEONE. Don't guess as you can put it on backwards causing the entire setup to be out of line. This will usually cause uneven wear on one side of the sprockets.
- If you haven't riveted a chain before then have someone help you or make sure you know what you're doing. Also, it may help to have an extra rivet link, just in case.
Common Questions
1. Is Kerosene better to clean your chain than WD40?
The fact is that we have seen no data to back up that either of these are bad on the o-rings of a chain. In fact we have been running a test leaving o-rings submerged in both substances then taking them out and letting them dry and then back in the solution. We have been testing this for a year we see no difference in either solution and both appear to not damage o-rings at all.
2. I was told to stick with 525 or 530 pitch setup as it lasts longer?
People often forget the most important part here. It will last longer if you get 100% the same products. If you compare one of our high end 520 chains to a mediocre 525 chain our chain will last longer as it's better quality. If you compare our superlight steel 520 chain kits to ANY 530 hard anodized alum chain kit our chain kit will out last it by a long time. The steel rear sprocket in 520 is still much stronger and will last much longer then the 530 alum rear sprocket, not too mention the 520 superlight steel chain kit will weigh less, cost less, and last longer. So the key here is that not all chain kits are created equal. We would rather you pay less and get a high quality 520 chain kit that is lightweight and will last as long as other 525 and 530 chain kits. Maintenance plays the largest factor though.
3. I was told that on a new chain kit to keep the chain tight as it will stretch in?
This is horrible information as it will destroy your chain kit. Fact is the chain is made of steel so how does it stretch? Can you pull on it and stretch steel? What actually happens is when there is tension (tight chain) the plates pull on the rollers. The plates then dig into the rollers or the rollers dig into the plates. When this happens, it creates "slop" in the chain and the chain can extend as it wears out. So the chain isn't "stretching" but the holes are widening or the plates are digging into the rollers and either way, you're destroying your chain. A long time ago when chains were first produced you could pull on them and they would "stretch". Of course they were not really stretching but more just seating and pulling the slop out of the chain. However, all high-quality chains now come from the manufacturer and are "pre stretched" which means the very minor tolerances, gaps, or "slop" is pulled out of them. You should just install the chain as it is and set it to the OEM specs in terms of the chain slack. Also be sure and set the chain slack on the loose side of the OEM specs. It's always better to have a chain a hair too loose then a hair too tight so we recommend setting your chain on the loose side of the OEM specs.
4. I heard I should make my chain looser for the track and tighter for the street?
This is false. What tightens the chain is when the rear shock compresses. This raises the rear tire and makes the chain tighter. If you compress your rear shock fully and then let it out fully that will show you the loosest and tightest that your chain can get. The manufacturers have figured this out and then given you the chain slack recommendations in your bike manual. It doesn't matter where you ride, track or street, the chain can only get so tight as it's based upon the angle of your swingarm and the range of motion of your rear shock. There is no need to have different settings for different places that you ride in. In fact, if you think about it on the street your chain will normally get tighter and looser a lot more as the street has speed bumps, potholes, etc that you will hit greatly compressing your shock and tightening your chain. So set your chain slack to the loose side of your manuals specs and you'll be fine. Now if you change out your swingarm or rear shock then yes, your chain slack settings can change, and you should talk to whoever produced the swingarm or shock that you purchased.
5. How many miles or how often should I clean my chain, lube it, and set the slack?
We recommend checking your chain slack every time before you ride. It's just one part of a good bike inspection before riding. As for how often to clean/lube the chain we can't really state that as there are many variables that affect this. If you live near the ocean where there is a lot of salt, ride on gravel roads, etc will all determine how often to clean. Most who have chain kits that last a very long time will clean the chain after they ride in the water, once a week, etc. There really isn't a black and white answer to this question, but use common sense based on how long you want the chain kit to last. Maintenance is the #1 factor in how long your chain kit will last so think about how often you ride, the elements/weather you ride in, and then make your decision.